
From the archives, this time 4 years ago. My old website had some blog posts on it that i’ll be transferring here week by week. The first one has been requested and being wintertime it’s a good fit.
12/21/15

The idea:
Mike came to me with a desire to build a bike around the soon to be released Vee Rubber
Snowshoe 2XL tires that were showcased at the Taipei bike show back in March. The prototypes were 32″ in diameter and ~5.6″ wide on a 100mm rim. Without having the tire in hand i set about following the mtbr thread (http://forums.mtbr.com/fat-bikes/26×5-05-xxl-958904.html) that had as detailed specs as one could hope for at the time. The tires were a LOT bigger than the next biggest tire – Surly Bud and Lou – so a completely new frame design was needed. Mike is known for his extensive experience with fatbikes
(http://lacemine29.blogspot.com/2008/02/snowbike-timeline.html) and basically having the most kick-ass fatbikes on the planet built for him. So getting his email was a bit daunting. How in the world was I going to match the building prowess of Brad Bingham (http://fatbike.
com/2014/02/eriksen-husky-titanium-fatbike/), the builder of his Snoots and Eriksen Titanium fatbikes with flawless fabrication and welds, not to mention sealed internal liquid gas chambers..? I’m just not of the same caliber at this point in my framebuilding career. I’m not being humble, just honest. But as Mike said to me, “You may not have his level of experience,or the access to tools, parts, or capital that he’s had at Moots or Eriksen, but you give a shit and that’s just as important in creating quality.” I’ll take that as a compliment.
How in hell am i going to fit those tires?!
Luckily by the time i got around to his place in the queue the actual tire had come out and it was much smaller than the prototype: 5.1″ wide and 31.5″ diameter. Mike sent me a Clown Shoe wheelset with one tire to use for my drawings and to check spacing. He still wanted room for a 5.5″ tire just in case Vee released a “3XL” but that was second to getting the geometry right. We had settled on using a 197×12 rear hub, a 20t ring on a Surly Mr. Whirly crankset, and a SRAM DH 7-spd cassette to allow shorter chainstays with a chainline that didn’t let the chain rub on tire in the lowest gear.
If you know Mike, he loves short chainstay fatbikes, so getting that dimension as short as
possible was one of the top goals of this frame. I drew up a bunch of options and was having trouble getting anything below 470mm chainstays. He then thought of asking Brad to fabricatehim a wider hub to push out the rear chainline and make it easier for the chain to clear the wideass tire. (This was an option? Pretty cool.) We settled on a 217 rear hub, 10mm wider on each side than a 197. The reason being, on this type of expedition bike where flotation (and not pushing your bike) is the ultimate goal the rider will spend most of his/her time in the lower gears of the cassette, not in the higher gears going fast on groomers. Having a wider rear chainline than in the front makes good sense. It means less crossover in the range where you spend most of your time and that is more efficient — less energy to pedal and less chain and cog wear. The rear chainline would become around 82mm with the 217mm hub (compared to 72 for the 197 hub). With a Race Face 190 crankset (BB spindle spaced for 190/197mm rear axle) and a chainline of 78mm (with the non-flipped direct mount ring) that skews the chainline
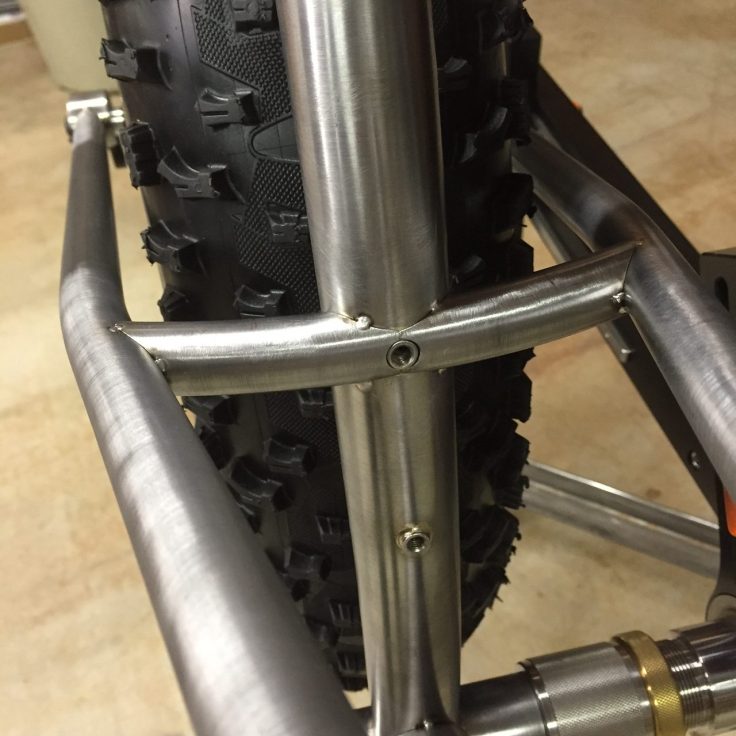
to the lower gears vs. the opposite with the 197 hub. So is 217 going to catch on? I don’t know, but it does make it easier to build around this tire size if you want to run anything but a singlespeed or IGH. The compromise of a wider hub, a wide tire, and short chainstays is dealing with chainring, crankarm, and heel clearance with the chainstay itself. This is why most short chainstay bikes in general have specially machined yokes. Even with a yoke it’d be hard to get short chainstays with a 5.5″ wide tire and the current crank and chainline options. Elevated-chainstays. I’ve made two other e-stays (https://meriwethercycles.wordpress.com/2013/12/15/elevatedchainstay-
fatbike/) mostly to accommodate the existing allowable crankset clearances with the biggest tires. This frame design just make sense for fatbikes. The elevated chainstay removes the chainstay from the problem area in between the tire, chainring, crankarm, and chain. If you raise the chainstay enough, you can clear the crankarm and use a narrower chainline than with a traditional rear triangle frame, assuming the chain clears the tire. The new design with estays allowed me to draw up a frame with a chainstay length of 440mm. This is a 3mm shorter effective chainstay length than his Eriksen that maxed out at a Bud/Lou (which actually only measures 4.7″ wide at most). Effective is the key word here, and to me makes more sense in quoting than actual chainstay length because it’s the horizontal distance from the BB to the rear axle. The frame’s BB drop changes the effective CS length but not the actual, and with different diameter tires the builder should be varying lots of other variables, especially the BB drop.
Elevated stay bikes have a bad rap for being an inferior frame design but for fatbikes the design should be reconsidered, especially if you want to have a bike with short chainstays. Just look at the new Trek Stache 29+, or the Specialized Fuze 27.5+. Their chainstays are heavily modified to fit everything in that tight spot. One of the first real fatbikes was an elevated stay bike – the Remolino Fatty. There are numerous other examples of these bikes that only failed by and large because they’re ugly. They’re all very cool in their differences though — Nishiki Alien, Yeti Ultimate, Rocky Mountain Summit, Alpinestars, Mrazek, Brave Warrior, Mantis XCR, and Fisher. There are likely more. Whether the frames failed (broke) more than other frames I really don’t know the statistics. I believe some of the early e-stay builders tried to use the same butted tubing as the double diamond frames and some designs failed more than others. If i remember correctly it was mostly the Fisher Montare that cracked at the seat tube. It doesn’t have “supports” to the downtube from the seat tube which was an addition to every other frame design. But once the e-stay had that bad rap it was game over for them. My inspiration for first making an elevated stay frame came from a friend that i made my first Estay for that saw the Chris Herting’s 3D-Racing belt-drive fatbike http://durangodevo.com/wpcontent/ uploads/Ch-snowbike2.jpg.JPG) several years ago. It’s a belt drive fatty – another perk of the e-stay is not having to split the frame. Mike’s is my 3rd e-stay frame with the first two still alive and well. E-stays are an acquired taste but they do have their benefits: no chainslap, easier rear wheel removal, short chainstays without dimpling/special yoke/ovalized tubing, the belt drive option, and potential for lower Q-factor cranks since the arms swing under the elevated stays, etc.
The Fork:
The other main challenge of this bike was the fork. He wanted a unicrown fork but no stock unicrown fork blades would fit a 5.5″ wide tire using hooded 15QR dropouts, even with a tapered steerer tube. I had been wanting to buy a new bender anyways so this gave me another excuse to buy a ProTools MB-105HD. I purchased the 1.125″ x 4.5″ radius die and some 4130 1.125 x 0.058″ tubing for the upper crown segments and used 1″ x 0.035″ wall 4130 to sleeve into the uppers, Potts Type 2 style. I had to make a unicrown fork mitering fixture to use on my horizontal mill and used some aluminum extrusion and a 1/2″ plate I’ve had lying around for this purpose. The tilt table I bought from ENCO to dedicate to this fixture. The fork is 490mm axle to crown so he can swap to a Lauf fork and not change the geometry too much, 57mm of offset to get 100mm of trail with a 68 degree head tube angle. He can run up to a 5.8″ tire if a bigger tire ever comes out. Two bottle bosses were added on each leg for extra water capacity.


Geometry:
BikeCAD was used and even though it doesn’t represent e-stays well i usually build the rear triangle using life-size paper sketch-ups anyways. Mike knew exactly what he wanted me to build for contact points and frame geometry. He wanted an upright position with a shorter than normal top tube of 23.25″, short as possible chainstays, 100mm of trail, 12.4″ BB height, 31-32″ standover, and a handle for portaging the bike with a framebag, internal routing for a dropper post. This is what I came up with:
– 68 HTA
– 73.5 effective STA
– 470 seat tube length
– 698mm front center
– 440 actual/433mm effective CS length
– 590mm effective top tube length
– 80mm BB drop for an un-sagged BB height of ~12.5″ with the current tire diameter of 800mm.
In order to build a bike with a 217 rear hub, you need the hub obviously (thanks to Brad for fabricating that piece of the puzzle!), and you need a dummy axle for fixturing the stays in place. I could’ve asked Don at Anvil for one, but…since I thought this would be the only 217 spaced fatbike I was going to ever make I made one out of some aluminum rod on the late.

Tubing:
I used a lot of straight gauge 4130 steel on this frame. If you don’t know what that is, it’s basically aircraft grade chromoly that is not heat treated or butted like most current bicycle tubing. It’s plenty strong though, and is better suited for bikes when doing extreme bending and dimpling or with bikes that will be beat on and weighted with lots of gear.
For this frame I decided on a 1.5″ diameter x 0.035″ wall (38 x 0.9mm) downtube. For e-stays this is pretty much required since the chainstays join into the middle of the downtube. As said above, most steel bicycle frame tubing is double-butted, meaning the ends are thicker walled than the centers. So a usual downtube would be “9/6/9” for a mountain bike which stands for the ends being 0.9mm wall thickness and the middle being 0.6mm thick. There are many options that included 8/5/8, 7/4/7, 6/4/6, and even 5/4/5. The thinner-walled tubes dent easier but are heat treated to keep their strength high if their wall thicknesses low. The middle butted section is the majority of the length of the tube unless you’re using a tube designed for BMX use (i.e., True Temper Supertherm). The last two e-stay frames I used a Supertherm tube for the downtube and joined the chainstays to the thicker walled butt of the tube. But for this frame I couldn’t do that since i was raising the e-stays higher to avoid the crankarms. With creative bending one could bend the stays down towards the BB but I did not choose to tackle that extra bend and run them in a straight line from rear axle to downtube. The top tube is the only butted tube of the bunch – 31.8 x 9/6/9 True Temper. The seat tube is a bent (rolled) 35 x .9mm 4130 with a weld-in collar on top. The “handle” or top tube/seat tube brace is 22 x .9mm 4130, and the seatstays are tapered 19 x 0.8mm.
Rear Rack:
This took a day for me to fabricate. Meant to carry a stuff sack and not more than about 25lbs of gear. It’s made out of 3/8″ x 0.035″ tubing, tig-tacked and brazed together with bronze.

Issues:
The biggest issue is heel and calf clearance with the chainstays. Some of this is purely that to fit this sized tire with 17″ chainstays and the addition of a 217 hub makes things wide. In my drawings and mock-ups everything worked fine but it’s kinda hard to model calf-clearance. On version 2 I will give the chainstays a slight s-bend about 100mm up from the rear axle to provide additional heel clearance for big winter boots. I will also ovalize the stays near the seat tube brace since that’s where Mike’s calves can occasionally rub. Overall, it’s fine to ride, butthese are tweaks that will make it better. The main reason i did not put a second bend in the chainstays was to avoid contact of the chainstay with the chain. Without custom dropouts that put the axle w ell below the chainstay attachment point there is potential for the chain to rub thechainstay in the lowest cogs. If you look at many e-stay designs, they use a cantilevered dropout design to avoid this issue (see the 3D pic linked above).


Discover more from Meriwether Cycles
Subscribe to get the latest posts sent to your email.
Would that design be strong enough to add a Pinion to it?
I’ve yet to do a Pinon but will be making one this year for a fatbike. With a belt I would do it differently and make it asymmetric to minimize the chance of dropping the belt from flex